ZL2AFP DominoEX HELP 

HELP MENU Installation Guided Tour Tuning Signals Questions Answered
HELP MENU Installation Guided Tour Tuning Signals Questions Answered
Simply unzip the downloaded or supplied archive (DominoEXxxx.zip) into an appropriate folder on your hard drive. C:\Program Files\ZL2AFP\DominoEX is suggested. Only one file is required (the executable .EXE) to operate the software, although the archive may contain this help information (lots of other files).
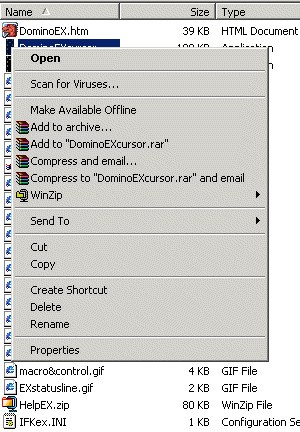
Create a link to the program, right-click on the executable filename (DominoEXnnn.exe) in Explorer (see picture on right - click on it for a bigger view). You can then drag this shortcut to the Desktop or Task Bar. A setup file will be created when you first start the program. Any other files in the archive will be associated with this help system, and if needed, should all be unzipped into the same folder as the executable.
The program should work on any PC with Windows™ 95 or later, provided it has a Sound Blaster™ compatable sound card. A computer speed of 120MHz and 32MB of memory should suffice, although the software will be much more responsive on faster computers. 8 baud, 16 baud and 22 baud speeds may not receive correctly on a 120MHz Pentium (operation is correct but response is slow on the author's P1 166MHz laptop). In general, the program will work best on a 300MHz Pentium or better. The program may not transmit on some older laptops with simplex ESS sound chips.
Upgrade - Simply copy or extract the new version into the same folder as before, and create a new shortcut.
Program removal -Simply delete the complete program folder and all contents. Delete any shortcuts you made. No changes are made to the registry, no system files are changed, and no files are stored elsewhere.
You will also require suitable cables or an interface for connection between the sound card and the HF transceiver. These are the same cables you would use for other digital modes. PTT control is offered via a serial port.PTT is available from the DTR pin of any computer serial port. This pin goes positive to transmit, and should be connected to the rig PTT via an opto-coupler. The software supports COM1 to COM9. If you use VOX, set the COM port to 'none'.The software expects receiver audio on the Line Input. A few computers (some laptops) have only a Mic Input, and this will also work, provided there is not too much signal. Preferably use the Line Input. The software expects to output signals to the transmitter microphone circuit via the Line Output. Some sound cards only have a Speaker Output, and this works too. Preferably use the Line Output.
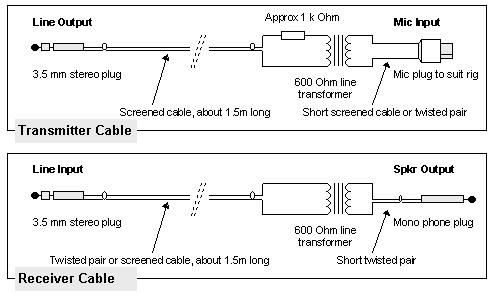
You can use a commercial interface such as the West Mountain Radio RigBlaster, or the Featuretech Interface, or you can make your own cables. Let's assume you want to make your own cables - it really isn't difficult. There are two cables to be made (see diagram below), plus a third if you don't have VOX on your rig. Start with two 1.5m lengths of screened audio cable or RG174 coax, and connect a 3.5mm stereo plug to one end of each cable, wiring the screen (shield) to the sleeve, and the inner wire to the tip. Leave the "ring" unconnected in both cases. Label one cable "TX" and the other "RX".
The other end of the TX cable connects to a small 600 Ohm line transformer or transistor radio interstage transformer. Connect the screen (shield) to one end of the primary winding, and the inner wire through a resistor of about 1k Ohm to the other end of the primary winding. The secondary winding is connected directly to a microphone plug or accessory plug to the transceiver. Use a short length of screened cable. You may wish to mount the transformer and resistor in a small box. You may need to add another resistor to this box to set the signal level correctly.
The other end of the RX cable connects to a small line transformer or transistor radio interstage transformer. Connect the screen (shield) to one end of the primary winding, and the inner wire directly to the other end of the primary winding. The secondary winding is connected directly via two short lengths of wire to a 3.5mm or other suitable plug for the speaker output or accessory socket of the transceiver. Make sure the setup allows you to hear the audio from the receiver. For example, you could use a tiny 32 Ohm speaker from an old modem across the transformer. A good way to make the connections is to mount the small transformer in the rig's loudspeaker enclosure, wiring the transformer across the speaker.
The transformers are NOT optional! They provide very important electrical isolation between the rig and the computer, safeguarding both from damage. The main purpose is to prevent a hum loop and unacceptable noise on the transmitted signal, but they also help to keep computer noise out of the receiver, high DC current from the transmitter in the computer earth, and RF from the transmitter out of the computer. Without the transformers, computer sound cards and transceiver mic circuits have been damaged by high power supply current taking an alternate path back to the supply, so make sure that there is no DC connection between the two ends of the cables.
In setting up the system, you may need to adjust the transmitter cable resistor value or add a resistor or two to the receiver transformer to reduce the signal, especially if you are using the Mic Input. In the transmitter cable, place the extra resistor (say 100 Ohm) across the cable to the 3.5mm stereo plug (either end). To attenuate the receiver signal, put a similar pair of resistors in the receiver cable. If you are using interstage or tapped transformers, you can also change the signal level by changing taps or swapping the transformer windings over.
Connect the cables to the sound card Line In and Line Out, and to the rig at the other end. Make sure that the microphone is inactive (if you are using the accessory socket) and that the VOX is off. Start the computer, and then the software.
Note:
Some rigs will not operate VOX when the accessory socket is in use. Others require the microphone to be disconnected to enable audio from the accessory socket. Some also leave the microphone live while using the accessory socket.If you cannot get the VOX to work with the intended setup, you will need to use a transmit PTT signal from the computer.
Start the program by double-clicking the executable program filename in Explorer, or preferably using the shortcut you have created. A single window is displayed, containing all you will need for enjoyable QSOs. The first thing to do is to set the user's callsign by clicking on Options on the menu bar, and dragging the mouse down to Callsign. Insert your callsign in the dialog box and click 'OK'. This allows the automatic 'macros' to generate the required information.It does not matter too much if the transmitter operates non-linearly, but it is best to keep drive to the minimum necessary, in order to reduce the risk of hum and transmitter overload. Remember also that if the sound card output is too high, or the level into the rig is too high, clipping can result. Assymetrical clipping causes second harmonics to be generated, and these will still be within the transmitter passband, and will appear on air. A good guide is to start with the sound card Wave and Volume Control level controls down to about 1/4 and then, with the rig's mic gain set at the normal setting for SSB, adjust the Volume Control level to drive the rig to just below where there an ALC indication.The size of the application window is adjustable. The default size is 640 x 480 pixels, but it can be dragged wider and taller by left-clicking and dragging on the right or left edge, or on the bottom right corner, and dragging with the mouse button down. The tuning display graphics are of fixed size, so stay the same when the screen is enlarged. The window can also be made to take up the full screen using the Maximize button on the program banner (top right).
Setting up the sound card is no different from other modes. Set the receive signal level by adjustment of 'Line In' on the Recording Control Applet, which can be called up from the Menu Soundcard/Input item. Make sure that the 'Line In' tick box on the applet has a tick showing. Set the transmitter level by adjusting the Wave slider on the Volume Control Applet, which can be called up from the Menu Soundcard/Output item.
Note:
If you have Windows 95™ or Windows 98™, calling up from the Menu Soundcard/Input item may result in you seeing the Volume Control applet instead. Select Options and select the Recording radio button to see the recording (receiving) controls.
Your transmitter will be happier if you keep the power down on long overs.
The mode is very sensitive and 1W output power will give you an impressive operating range.
* The default mode (marked pink in table) is 11 baud spaced baud rate x1, FEC off.
Defining the best quality algorithm for soft-decision FEC is an on-going project. The present quality algorithm is based on the remainder from the IFK+ rounding
process, and so is a measure of the instantaneous Doppler shift.
Sometimes you may find Soft decoding copies better than Hard. In general Hard suits AWGN conditions, while Soft suits NVIS conditions. The default mode is Hard.
With FEC on, different character sets are used.
The secondary character set is always restricted to 64 characters on transmit and receive, while the main font has most of the extended ASCII set. Neither are affected by this option.
A button labelled '2nd' to the left of this window allows you to access a dialog to change the Secondary Text message.
You can change the message any time - including while on transmit.
This message should always include your callsign, but can include anything
else, up to 256 characters. Shorter messages are better. Messages over about 60 characters will overflow the receive display,
and will be scrolled through as new text arrives.
Note:Guided Tour
The program consists of just one main window,
from which all settings and features are accessed. There are several main areas to consider. These are:
The Secondary Text provides an instant Beacon Mode. Set the message you want, and start the transmitter! You don't need to type anything else. It is also a handy
feature for net control instructions and can be useful for advertising skeds, operating location and equipment - you name it!
Bear in mind that your version of the software may have slightly different menu options, and they may be
differently arranged to those shown. It is very difficult to keep the help file as current as the software releases. This description applies to
DominoEXFEC version 2.0d Build 3.12.06. The version information is given in Help/About (see below).
Menu
At the top of the main window underneath the "banner" is a line of text reading "File Mode
Options Tools Soundcard Help". If you click on any of these, various options are available via drop-down menus (lef-click on the item and drag down). You may note that some of these items have the first letter underlined. This indicates that the menu can also be brought up using the ALT key, so the menu can be navigated with cursor keys. If you can't see these underlined characters, (depends on operating system) press the ALT key.
MODE
BAUD
BW
TONES
SPEED
FEC
TONE SPACING
DominoEX 4
3.90625
173Hz
18
~25 WPM
~12 WPM
Baud rate x2
DominoEX 5
5.3833
244Hz
18
~31 WPM
~16 WPM
Baud rate x2
DominoEX 8
7.8125
346Hz
18
~50 WPM
~25 WPM
Baud rate x2
*
DominoEX 11
10.766
262Hz
18
~70 WPM
~35 WPM
Baud rate x1
DominoEX 16
15.625
355Hz
18
~100 WPM
~50 WPM
Baud rate x1
DominoEX 22
21.533
524Hz
18
~140 WPM
~70 WPM
Baud rate x1 Secondary Text Bar
A small window across the top of the program below the menu is used to display "Secondary Text". This data is received whenever the
sender's typing is not keeping up with the native speed of the mode, and is used to repeatedly send a fixed ID or informative message. Both
the transmitting station's message (during transmit) and the message of the station being received are shown here,
scrolling along like an advertising display in a single line.
The Secondary Text has no effect on the available typing speed. The Secondary Text will slow down or even stop if you type fast enough, and will also stop if you have text in the type-ahead buffer or send a file, so the main text then operates at full speed.
Receive Window
 The Receive Window is the large window (white background) immediately below the Secondary Text Bar. Anything
received appears here, including junk between stations if the squelch is set low. Whatever is transmitted also appears here too, but
only as the characters are actually transmitted. When the last transmitted text appears here, you can safely
return to receive (see also notes below about the special <EOT> command).
The Receive Window is the large window (white background) immediately below the Secondary Text Bar. Anything
received appears here, including junk between stations if the squelch is set low. Whatever is transmitted also appears here too, but
only as the characters are actually transmitted. When the last transmitted text appears here, you can safely
return to receive (see also notes below about the special <EOT> command).
Normally the text appears sequentially line after line, with old text scrolling off the top of the display. However, by clicking in the window, it is possible to change the "insertion point" so the text will (in a most confusing manner) appear before text already received. This is a Windows 'feature'. Normally this is no issue, but if you click in the Receive Window in order to cut and paste text, remember to return the insertion point below the last received text (by re-clicking below the text). Text can be copied from this window by highlighting with the mouse and pressing CTRL+C. You need to first stop the receiver with the Stop button in order to do this.
Macro text appears in the Transmit Window after macro keys are pressed. File text is sent without appearing in the Transmit Window. You can't send binary files!
 Three tuning displays are provided. The largest and most obvious is the Waterfall Display, the upper-most
of the group on the right of the Receive Window. This indicates the signal tuning, and the quality of the
received signal. Because the DominoEX Waterfall is synchronous with the signal,
it will give a very sharp and clear display if the signal is of the correct type, and will be slightly blurred if it is not.
Each little white dot (domino pip?) represents a burst of tone, or symbol. The scale on the left
is frequency, in Hz, and changes when the mode is changed. The bottom of the scale (by default 1000Hz) is set by
sliding the waterfall with the mouse.
Three tuning displays are provided. The largest and most obvious is the Waterfall Display, the upper-most
of the group on the right of the Receive Window. This indicates the signal tuning, and the quality of the
received signal. Because the DominoEX Waterfall is synchronous with the signal,
it will give a very sharp and clear display if the signal is of the correct type, and will be slightly blurred if it is not.
Each little white dot (domino pip?) represents a burst of tone, or symbol. The scale on the left
is frequency, in Hz, and changes when the mode is changed. The bottom of the scale (by default 1000Hz) is set by
sliding the waterfall with the mouse.
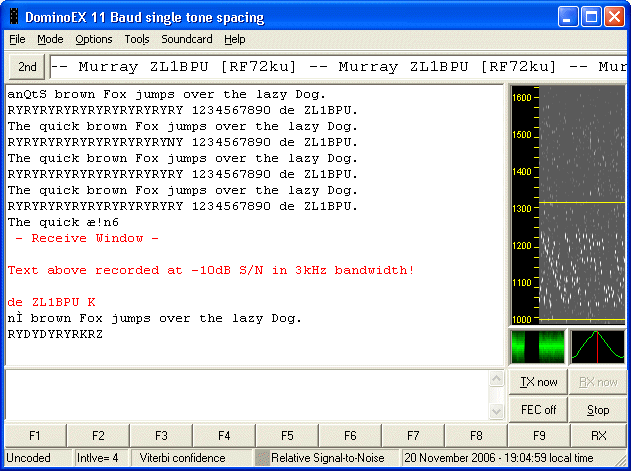
The waterfall clarity is superb - you can always see the signal, even if it is very weak. The DominoEX example to the right was recorded with the signal 10dB below the noise in a 3kHz bandwidth, and the signal can be tuned by eye down to -15dB! Most other digital mode software is very difficult to tune with the signal below or even near the noise, because you can't tell signal from noise. PSK31 is perhaps the exception because the power is concentrated in a very narrow band.
 The waterfall image moves left to right with time, and
can be dragged up and down to tune the signal. Two yellow lines are visible on the display - one in the centre
of the waterfall, the other right at the bottom of the waterfall. If all the signal falls between these two yellow lines
(which are preset to indicate the receiving range), then the signal will be decoded correctly. It does
not matter where in this window the signal falls, or if it drifts (provided all of the signal stays within the yellow lines).
This gives you considerable tuning latitude.
The waterfall image moves left to right with time, and
can be dragged up and down to tune the signal. Two yellow lines are visible on the display - one in the centre
of the waterfall, the other right at the bottom of the waterfall. If all the signal falls between these two yellow lines
(which are preset to indicate the receiving range), then the signal will be decoded correctly. It does
not matter where in this window the signal falls, or if it drifts (provided all of the signal stays within the yellow lines).
This gives you considerable tuning latitude.
As the waterfall is dragged up and down, the transmitter frequencies also change. The transmitted signal will always be set to the range the receiver is set to. In other words, the software operates like a transceiver. The default transmitter signal is from 1100Hz upwards, but for users who prefer to use high tones (as for RTTY, say if the rig has a narrow RTTY filter), the waterfall can be dragged up to a suitable frequency. It is best not to operate with lower tones, as the second or even third harmonic of the tones will be within the transmitter filter, and any harmonic distortion will be transmitted, leading to an unnecessarily wide signal.
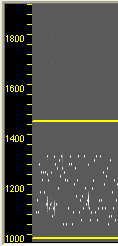
In the first waterfall example to the right, you can see the signal as a series of little white stripes over the range 1030 to 1230Hz. The 11 baud signal is only roughly centred between the yellow lines, and is about 200Hz wide. Adjustment of Waterfall tuning is described under Receiving (below). As the signal gets weaker, the noise background becomes more obvious, but you will be able to easily tune any signal that could be copied.
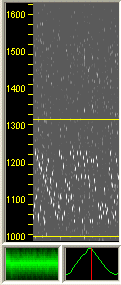
In the next picture to the left, the mode is different (8 baud) and the signal is between 1030 and 1320Hz (the scale has changed). When there are significant problems caused by multi-path reception, the distinct little white stripes will show broadening or transient effects (they can be seen in this picture). When this becomes quite marked, copy will suffer, and a slower mode should be used.
Sync Displays
Below the Waterfall Display are two small Sync Displays. Their main purpose is to illustrate received timing variations.
They can be useful in assessing propagation when considering using different speeds.
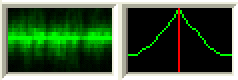
On the left, below the waterfall, a cumulative indication of symbol sync versus time is shown. This is useful as an indication of multi-path reception, and the sync can often be seen to change abruptly when there is a fade. This display moves from left to right, and illustrates the tips of the sync triangle in the time domain. A bright green band indicates the centre of each successive symbol, as the display slowly moves along. Ragged upper and lower edges indicate multi-path reception. Fades will show as a darker or narrower section, followed perhaps by a vertical shift in the green band. There will also be a vertical shift in the green band whenever reception starts and the new signal is acquired. The height of this window is equivalent to the length of one symbol (1/baud rate).
On the right, below the Waterfall, the instantaneous Sync Display shows how each symbol is interpreted. A triangular green line with the apex uppermost indicates where the receiving software has determined the centre of the current symbol to be. This indication changes quickly with propagation changes. The red vertical line indicates the average receiver symbol clock position, i.e. the average of the peak in the green line. Sync tracks very quickly and is not affected greatly by noise.
The receiver signal level should be adjusted so that this display shows a full-height green triangle, perhaps a little flattened on top, but not too flattened, and not too small, preferably at least half the maximum height. This is best adjusted using the sound card Recording Control applet level control rather than the receiver audio gain. The height of the green line may change with signal strength, but operation is not fussy as the software has excellent AGC.
Signal Metric Displays
If you use a program window size is greater than 600 pixels high (for example you maximize or drag the window
larger on an 800 x 600 or larger screen), an extra little window appears, just below the sync meters, in which three further metrics are displayed. All have scales 0% (bottom) to 100% (top), and all move along slowly at the same speed, one pixel per eight signal symbols. These metrics give the experienced
operator a very good guide to the prevailing conditions. No other program shows you this much information
about the signal!
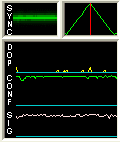
The first of these is the Doppler graph, which shows the historical mean absolute Doppler error in each group of eight received symbols. (The frequency error for each of the eight symbols is added ignoring sign). Normally this value is low, but if it intermittently exceeds 75% or regularly exceeds 50%, treat this as an indication that the current operating mode is probably too fast for the prevailing conditions. 100% represents the point where the Doppler effects on the signal have caused the signal to stray into the next tone position. These Doppler events may coincide with 'spikes' on the waterfall display. A steady offset above zero indicates serious drift in the transmitter or receiver.
The second graph indicates the Viterbi decoder Confidence, a historical record of the mean Confidence in each group of eight received symbols. On noise, this graph hovers at around 50% - on incorrect signals (wrong speed or no FEC) or receiving a steady carrier the value will be lower - on correctly FEC coded signals it will rise close to 100%.
The final graph indicates the Signal to Noise assessment, a historical record of the mean S/N in each group of eight received symbols. On noise, this graph hovers at a low value and increases as the signal comes out of the noise. Good signals typically indicate 70% or more. The value will typically be unusually low if the speed setting is wrong.

Macros
Ten Macro Buttons are provided under the TX Window. When you press one of these with a mouse click, standard text is placed into the
TX buffer for transmission. You can change both the text content and the labels, and thus the purpose of the buttons.
This is done by right-clicking on the button, and editing the text in a small dialog box.
Each one of the buttons corresponds to a Function Key on the keyboard, hence the default names for the buttons. They can therefore also be called up by pressing the corresponding Function Key, which most operators find more convenient, as they then don't have to change focus from the keyboard to the mouse. It is suggested that when the button function is changed, the Function Key number be retained as part of the button name.
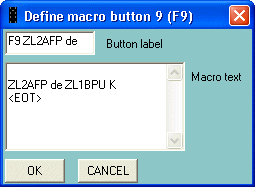
In the example above (its details are to the right), the F9 button text is truncated. If you stretch or maximise the program window, the buttons enlarge so you can see more text.
Note that the F10 Macro is pre-defined to provide a 'delayed end of over', sending the special <EOT> sequence.
This Macro can also be edited, so you can easily append your callsign. The message can have several lines of text. Whenever you use <EOT>, it should be on a new line. Any text typed after this will not be transmitted until the next over. Here's an example:
de ZL1BPU K
<EOT>
The special <EOT> sequence can be used in any of the other Macros, so for example you can easily make a CQ message that stops the transmitter when it's done. The <EOT> sequence is also recognised from the keyboard. The command actually operates in the receiver! This way you can be sure that all text in the buffer, coder and interleaver have been sent.
Controls
The four Control Buttons to the right, above the Macro Buttons, are Transmit, Receive,
Stop and FEC. The first three cause the
program to Transmit, Receive, or Pause (neither transmitting or receiving). I think we can all understand
these! The active mode has its button greyed out.
Note also that ALT+T, ALT+R and ALT+S respectively, sent from the keyboard, serve the same functions as clicking on the buttons with the mouse, and can be more convenient.
Be aware that the buttons all act instantly - if you press Receive or Stop (ALT+R or ALT+S) while transmitting, transmission will cease instantly, even with data still in the buffer. When you press Transmit again, sending will continue from the buffer where it left off. You can however use a 'delayed end of over' function through the use of the <EOT> sequence in any Macro. The software will then not return to receive until all the text buffer has been sent, up to the point where the Macro was used.
If you press Receive while the transmitter is still busy with transmitting data, you will cut the transmission short. It is really important to wait until all the data has gone before pressing Receive. Stop is useful to prevent the RX Window from moving up and down while you are trying to capture text.
FEC Function
The FEC button toggles from FEC Off (the default) to FEC On, and changes both the receiving and transmitting FEC setting. FEC returns to FEC Off when you change mode (i.e. change speed), and the interleaver is returned to the default value (L = 4), so the auto-FEC function
will operate correctly. Auto-FEC will switch the software to FEC On when a matching FEC coded transmission is detected. There is no Auto-FEC off.
The action of the FEC button is instantaneous in transmit and receive, although the results take a few seconds to appear due to the system latency. The current status of the FEC system is shown on the Status Line (see below).
Note:
The label on the FEC button indicates the current status of the FEC, not what it will become if you press it!
The bottom line of the window provides status information. On the left, the FEC status (shows 'Uncoded', 'Soft decode' or 'Hard decode'). Next is the Interleaver setting (default is I = 4). The next two left-to-right bar graph meters are related to signal quality. The first is the 'FEC Confidence', which indicates if, and how well, the FEC system is able to decode the signal. The next is the "Relative Signal to Noise Meter", which compares the power of the strongest tone against the background. Finally, on the right, for operator convenience, the current local date and time and date as reported by the computer.
The small graphic with diagonal lines at the extreme right of the Status Line is the "handle" used to adjust the program window size. Left-click on this point and drag the window as wide as you need. As the graphics are fixed-size, if you drag vertically, the receive window grows, but the tuning graphics and the Transmit Window remain the same size.
The DominoEX program automatically starts in receive mode. The Receive Control Button will be greyed-out. The waterfall and tuning displays will be active. Adjust the audio level (receiver gain at a comfortable level), then use the Soundcard / Input menu item to set the Input Level so the triangular green line moves near the top on background noise, and there is some sign of the noise on the waterfall display. The program has AGC and audio level is not critical. Tune in a signal, and adjust the tuning until ALL the signal is within the area between the yellow lines on the waterfall.You can tune the signal using the receiver tuning knob, but for fine adjustment it will be more convenient to adjust the waterfall up and down. This can be achieved by left-clicking on the waterfall and dragging the scale display or the waterfall itself up or down. The range is 0Hz to 3000Hz. If your computer speed is under 200MHz, drag slowly. Be aware that the scale of the display changes with the speed setting.
The Waterfall drag affects the outgoing transmitter signal frequency as well as the receiver signal, so works like a transceiver. It is best to set the Waterfall start (the scale value at the bottom yellow line) at 1000Hz (the default value) when tuning around for a QSO, and tune in the signal with the receiver so the lowest tone is close to 1100Hz. If you wish to use a rig with RTTY mode and higher frequency filters (typically around 2200Hz), drag the waterfall up when you start the program.
If clear text in the Receive Window does not result once you have a signal tuned in, check that ALL the signal is between the yellow lines, check that the signal is the "right way up" (correct sideband), and finally check that it is the correct mode! Then test to see if the transmission has FEC (strong indication on 'Confidence' meter). If the signal is tuned correctly, but only the Secondary Text is active, maybe it's a beacon transmission or the operator has fallen asleep...
If the receiver level is too high, the waterfall will smear and individual dots will be indistinct. If the level is too low, the waterfall display will be faint, and poor quality reception will result. Poor print quality can also occur if there is excessive multi-path on the signal. This will be observed on the waterfall as patches of wider than normal tones (vertical stripes or curved lines rather than dots). This effect often occurs at a point of fade, and can happen occasionally to frequently. If this happens frequently during a QSO, change to a lower speed as soon as possible, and also be alert for the other operator changing speed (you will hear the tones change).
Poor print quality can also be caused by strong interference, especially if the signal is weak. Copy may improve with FEC on. If not, change frequency to avoid the interference.
Hint:
DominoEX 11 received in one of the other modes, or vice versa, will give a blurry waterfall, and no sensible print. MFSK16 may look OK on the DominoEX 16 waterfall, but will not sync, the waterfall will show a dominant lowest tone, and there will of course be no sensible print.As the DominoEX signal drifts, you can adjust the receiver tuning slowly without losing copy, or drag the waterfall in the required direction to centre the signal. You only need to keep the signal between the yellow lines, so tuning is easy.
If your receiver step-tunes in 10Hz or smaller steps, you should not lose copy if you tune very slowly, but if the tuning is in 100Hz steps or greater, it will be better to drag the waterfall for tuning. The waterfall tuning has 1Hz resolution. In order to transmit back on about the same frequency, make sure the bottom of the received signal is just above the bottom of the waterfall.
While still receiving, you can type in the Transmit Window, cut and paste text, or press Macro buttons, so text will go into the TX Window. This text will be transmitted immediately the transmitter starts, followed by anything you subsequently type in the TX buffer. You can edit text in the buffer before it is sent, even copy, cut and paste, no matter whether the text was typed, copied from the RX window, or from the Macros. You can also do this while transmitting, but you'll need to be fairly quick! Backspace is handy, as it works "over the air" - you can correct text already sent by deleting at the other end!To start transmitting DominoEX, simply press ALT+T, or left-click the Transmit Control Button. This will now be greyed-out, and the transmitter signal will appear from the sound card, triggering the VOX in the transceiver. Without VOX, the transmitter can be automatically placed in transmit using a hardware transmit control circuit connected to a COM port DTR pin. When correctly set up, DTR goes positive on transmit. The very first time you transmit, there will be a short delay before any tones appear.
Put the software into transmit, and while it idles (no keyboard text sent), adjust the audio level and VOX sensitivity for correct operation. If using the Microphone input for transmit audio, it is best to leave the MIC level setting in the normal SSB position and adjust the transmit power level using the sound card applet. Use the Output Menu to set the Wave Level and the Volume Control to give the correct transmitter drive. Ensure that the sound card output or the transmitter microphone input are not overdriven. This can cause clipping, and assymmetrical clipping results in generation of harmonics within the transmitter passband. The result is a poor sounding signal with excessive bandwidth.
When all the text to be sent has gone (it will appear in the Rx Window) the transmitter will idle, sending 'Secondary Channel' characters, used to send your ID message, and at the same time keeping the receiving station's software in synchronism. As soon as new text is typed, this will be sent in place of the idling. (If you listen to the signal, you won't be able to hear that it is idling, because it is still sending data). Nobody will be able to tell if you are a slow typist!
At the end of an over, wait for the last text to be sent, as shown on the receive screen, and then press ALT+R or left-click on the Receive Control Button. The transmitter will stop immediately, and the receiver will start. Any characters remaining in the TX buffer (the Transmit Window) will remain there unsent until the start of the next over.
The over can also be completed automatically using a Macro. You can set up any of the Macro buttons to contain the <EOT> sequence, which will automatically switch the software to receive when the sequence is detected in the TX buffer. This is handy as it means you can finish typing your over, slip away for a cup of tea, and be back in time to read the incoming text and type the next over! The <EOT> sequence can be used in any Macro, and comes set up for an end of over sequence on Function Key F10. For more information about <EOT>, see 'Macro Buttons and Control Buttons' (above).
This programs encompasses six DominoEX modes, identical except for baud rate, speed and bandwidth, and hence of course performance. The lowest transmitted tone is 1100Hz in all modes.
- Modulation
- Multi-tone frequency shift keying, using one of 18 tones in a single uniform tone field, spaced x1 baud rate 11 baud and above, and 2x baud rate below 11 baud.
- Sync Modulation
- No Symbol Sync transmitted. Symbol Sync recovered from 8x oversampled receiver amplitude response to the sequence of symbols. Character sync transmitted as one bit per nibble, designed into the Varicode.
- Coding
- Characters are varicoded into one-, two-, or three-nibble items, which are subsequently incrementally coded nibble-wise by subtracting each nibble from the previous transmitted difference, in order to remove frequency dependence. Two Extended ASCII character sets (Primary and Secondary) are defined. A further binary varicode character set is defined for FEC use. This is based on the MFSK16 Extended ASCII varicode, but includes 64 secondary text characters.
- Forward Error Correction
- FEC is offered, and switches on automatically on reception of FEC, but not applied by default. The NASA standard R = 1/2 K = 7 convolutional coder is used, along with a sliding matrix interleaver of length L = 4.
- Necessary Bandwidth
- The necessary bandwidths for the most commonly used modes DominoEX 8, DominoEX 11 and DominoEX 16 are 346, 262 and 355Hz respectively.
- ITU Emission Designator
- The mode is SSB transmitted and therefore rates as J2B rather than F1B, so the modes mentioned above are 346HJ2B, 262HJ2B and 355HJ2B. It is impossible to tell from a reception point of view whether F1B or J2B is transmitted.
DominoEX will be a legal mode of transmission in most countries because it uses narrow-band MFSK, the operating program is publicly and freely available, and the coding technique and alphabet coding are also public domain. There is no hidden encryption, and the alphabets used are ITA5 (extended ASCII) or an ITA5 subset. If your country has more draconian rules, check with your administration - refer them to the DominoEX website, noting that MFSK16, with similar bandwidth and the same character set is already legal in most countries.In some countries J2D modes (data transmissions) >500Hz bandwidth are limited to the voice sections of the bands. DominoEX (with the exception of DominoEX 11) is under 500Hz wide, and always a J2B mode (teletype for manual reception) rather than J2D (data for automatic reception), so this ill-conceived rule does not apply to DominoEX on either count.
DominoEX is the first system available to Amateurs to exploit IFK on HF, and is also the first to deploy managed tone sets. It is not yet the ultimate digital mode - just the beginning! The authors are keen to hear from other developers interested in taking these ideas further, or in achieving some of what has been attempted here in some better way. For example, there are far more efficient ways to achieve improved ISI, and there are many receiving ideas that should be explored. There are developers with better skills and more experience, whose interest we are attempting to arouse with this simple program. We are especially interested to see mainstream developers include this mode in their Windows™ and LINUX™ applications.
If you save this file and its associated images in the same folder as the DominoEX executable, it will be called up by the HELP function within the program.
Technical Details of DominoEX
Frequently Asked Questions about DominoEXNo performance is guaranteed, or promised, either expressed or implied, and no responsibility will be accepted by the authors if the program or documentation fails to live up to expectations, or causes your PC or radio to crash and burn. All care, but no responsibility.
This program and associated documentation are respectively © Copyright Con Wassilieff ZL2AFP and Murray Greenman ZL1BPU 2003-2006. Please do not copy, alter or publish without permission. All Rights are Reserved. No trade marking is claimed for the 'DOMINO' or 'DominoEX' names. Apparently the 'DOMINO' Trade Mark is variously owned by big blue and a well known fast food delivery company, which may say something about the flavour of computer products, or the performance of pizza!