
Return to Digital Photography Articles
JPEGsnoop - Interesting Uses
by Calvin Hass © 2007
This page details a few of the many possible uses for the JPEGsnoop tool
Return to JPEGsnoop Main Page
Identifying Edited Photos
Ever wondered if that UFO photo or sasquatch sighting is a fake? ... or if that camera manufacturer's sample images have been touched up?
Simply open an image in JPEGsnoop and scroll down to the section titled, *** Searching Compression Signatures ***. This option can be enabled/disabled with the Signature Search item in the Options menu.
The utility will compare the compression characteristics of the photo against an internal database of thousands of camera "signatures" to locate a match. If a match is found, the matching digital camera or editor is shown. If the signature matches a photo editor (such as Photoshop), then there is a good chance that the photo has been edited (i.e. not original!).
The assessment line indicates one of four possible outcomes:
- Image is original
- Image is likely processed / edited
- Image is processed / edited
- Uncertain if processed or original
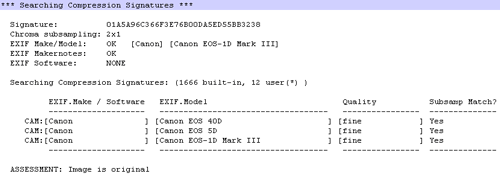 |
| Image is Authenticated as original |
You would be surprised at how many images on the web are apparently original, but are quickly revealed as being edited / post-processed. For example, even some of the "Sample Images" on Canon's official website have been edited in Photoshop, using Save As quality 10. The following is one such example. In this example, Canon may have wanted to enhance the sharpness or bring out the saturation, but it is easy to see how this can be misused.
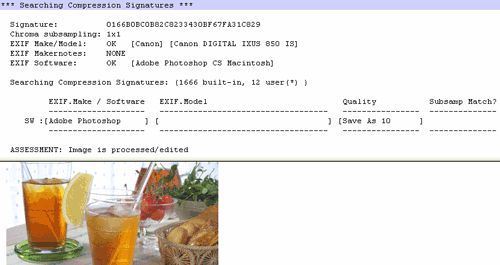 |
| Canon's Sample Image example was edited! |
Matching IJG Library Signatures
In some cases, JPEGsnoop may determine that the image's signature matches the digital fingerprint characteristic of IJG's compression quality scale. This scale is based on a formula that generates DQT tables based on a quality value from 1-100. The majority of image editors that provide a quality scale across this range use the same formula to generate their compression tables.
Once JPEGsnoop has determined a match, it will list out several known editors that use this particular scale, as they are all candidates and can produce the same signature.
Submit your own Compression Fingerprint / Signature!
While the built-in database includes thousands of signatures, not all digital cameras or software editors have been analyzed. If JPEGsnoop does not recognize the digicam or software editor, you have an opportunity to submit the compression signature to the JPEGsnoop database (stored on your computer and in the shared database).
If you know the origin of a file (i.e. you took a file direct from your digital camera, or the file is direct from saving within a photo editor / image processing program), then you are invited to submit the compression signature with the Add Camera/SW to DB... command. A dialog box will display the calculated compression signature unique to that file, along with a request for some additional details:
- What is the source of the file? Was it direct from your digital camera or has the file been processed / edited?
- The name of the software (e.g. Adobe Photoshop), if the file has been processed (i.e. no longer original).
- The image quality setting. In this field, you are requested to enter the quality setting (if you happen to know it). Digicams generally provide the user with a selection of up to three image quality modes (e.g. superfine, fine, normal). Similarly, if you have edited / processed a file with software, you are often given the choice of JPEG quality (e.g. high, medium, low, 70, etc.).
When submitting the compression signature to the database, no identifying information or image content is captured -- only the compression signature (a long series of digits) and setting info.
Local User Database
When you add a camera / editor to your database, it is included in all future searches for compression signatures when processing photos. If you want to modify or clear this list (for example, if you entered information that was invalid), then you can use the Manage User DB option.
JPEGsnoop stores the local user database (and configuration options) in the
following location:
<Profile Drive>/Documents and
Settings/<User Name>/Application Data/JPEGsnoop/
In Windows 95/98 (or in operating systems where the User Profiles haven't been configured), the data file is stored in the same directory as the executable.
Extract Embedded Images
How to Extract JPEG Thumbnail image
Simply open the image in JPEGsnoop, then press Ctrl-2 (Image Search Fwd) until you see the current decoded image is the embedded thumbnail (the image view will be very small, generally 160x120 pixels). Under the Tools menu, select Export JPEG and enter in a filename for the output thumbnail image.
How to Extract video frame from AVI movie file
Open the movie file in JPEGsnoop, and ensure that it has been decoded as a MotionJPEG file (only these AVI files are supported currently). Press Ctrl-2 (Image Search Fwd) until you see the desired video frame shown below in the image view window. Under the Tools menu, select Export JPEG and enter in a filename for the output frame image. Note that exporting frames from videos is completely lossless -- no recompression is applied!
Extract JPEG Images from PDF Documents
PDF Documents often contain embedded JPEG images. You can easily search through these images and extract the ones you want by using the Export JPEG command.
Motion JPEG AVI Decoding
Starting with version 0.7.0 of JPEGsnoop, you are now able to open and decode the underlying video stream from M-JPEG AVI files, which are often used in point & shoot digital cameras. Simply do the following:
- Open the .AVI file
- Use the Image Search Fwd command (Ctrl-2) to locate the first video frame
- Hold down Ctrl-2 for continuous playback and frame / histogram decode!
NOTE: As of version 1.0.0, JPEGsnoop parses the AVI RIFF file format, in an attempt to determine if the AVI file is Motion JPEG. If the AVI is MJPEG, then there is a good chance that you can step through each frame of the Image by using [Img Search Fwd]!
Identifying JPEG Quality
One of the more interesting details about a JPEG image is how the image quality is defined. The quality is defined in what is known as a quantization table, which is a series of 64 values representing different frequency components in the image. JPEGsnoop displays these tables under the marker section DQT.
Many programs use their own tables, while some base it on the example provided in the JPEG Standard Annex K. JPEGsnoop attempts to calculate an image quality rating that is based on the standard tables (compatible with cjpeg, djpeg and other tools). To help one identify whether or not the quantization table was derived from the example ones in the Annex, JPEGsnoop calculates the ratio between the Annex table and the file's table, after the heading: AnnexRatio. If all the values nearly the same, then it implies that the quantization table is simply a scaled version of the Annex table.
If the quantization tables are indeed based on the Annex table, then the quality factor (Approx quality factor) that is displayed should be accurate.
Identifying Photoshop Quality Settings
If you are interested in finding out what quality setting was used in Adobe Photoshop's Save As or Save For Web, look for the following in either the APP12 or APP13 marker sections:
Photoshop Save As Quality =
Photoshop Save For Web
Quality =
By resaving a JPEG with the same settings you significantly reduce the amount of recompression error!
Searching Executables - Enhancing your Scanner / Cellphone Camera Image Quality
With the help of JPEGsnoop, you can identify the changes required to hack / modify certain programs / firmware to increase their image quality. For example, I was able to improve the quality of JPEG images from my scanner! Many others have done a similar thing to improve the images out from their cellphone!
In release 1.0.0 of JPEGsnoop, you can locate the embedded compression quality settings within any software executable, using the Tools->Search Executable for DQT. Once located, you are then able improve the quality of the JPEG images created by this software!
How to Use Executable Search for DQT
This feature is only useful for advanced who have an understanding of the quantization tables. In essence, the basic idea is that many binary executables (software editors, drivers, utilities, firmware) contain a built-in JPEG encoder. These JPEG encoders often hard-code the DQT tables that define the resulting image quality delivered by the program. JPEGsnoop will attempt to locate the DQT table within an executable, which would then allow a "hacker" to modify the table to increase image quality or decrease output file size (for example).
NOTE: JPEGsnoop opens the executable files in read-only mode and will not make any changes!
There are two modes of operation:
- JPEG file not opened yet
- Prompt the user to locate an executable for examination.
- Search the executable for the JPEG Standard DQT (defined in Annex K)
- Search is performed with 1,2,4-byte luminance tables in both endian modes.
- JPEG file already opened
- Prompt the user to locate an executable for examination.
- Search the executable for the JPEG Standard DQT (defined in Annex K)
- Search the executable for a DQT that matches the luminance DQT (table 0) of the opened JPEG file
- Search is performed with 1,2,4-byte luminance tables in both endian modes.
So, let's say that you have a program called JPEG Maker (JPEGMaker.exe) and it generated an output file called NiceJPEG.jpg. Unfortunately, JPEG Maker didn't provide you with any options as to the output quality of the JPEG. Using JPEGsnoop, you determine that the DQT table (quality level) is very poor.
You open up a sample JPEG file from JPEG Maker (NiceJPEG.jpg), and then use the Search Executable for DQT command. JPEGsnoop prompts you to locate the binary (JPEGMaker.exe), and it then proceeds to search the JPEGMaker.exe file.
If you'd like to test this option, consider running it on the cjpeg.exe (IJG Library free JPEG Encoder) executable. You'll see that JPEGsnoop is able to find the JPEG standard DQT table in the file.
*** Searching Executable for DQT ***
  Filename: [cjpeg.exe]
  Size:     [104960]
  Searching for DQT Luminance table matching [JPEG Standard]
    Searching patterns with 1-byte DQT entries
    Searching patterns with 2-byte DQT entries
    Searching patterns with 2-byte DQT entries, endian byteswap
    Searching patterns with 4-byte DQT entries
    Searching patterns with 4-byte DQT entries, endian byteswap
      Found @ 0x00013BCF
  Done Search
|
| Searching Executable for DQT Table |
|---|
In the example above, JPEGsnoop located a 4-byte table in the executable starting at file offset 0x13BCF. If you were permitted to make changes to the executable, you would now have the file offset you need to insert your own DQT table.
The table below shows what the different search modes are looking for. Note that the search is for the DQT table with the zig-zag ordering (i.e. the same left-to-right, top-to-bottom sequence as in the JFIF DQT).
| Mode | Byte Swap? | Entries |
|---|---|---|
| Original DQT Table | 01,02,03 ... | |
| Search 1-byte Table | 0x 01 02 03 ... | |
| Search 2-byte Table | No | 0x 0001 0002 0003 ... |
| Search 2-byte Table | Yes | 0x 0100 0200 0300 ... |
| Search 4-byte Table | No | 0x 00000001 00000002 00000003 ... |
| Search 4-byte Table | Yes | 0x 01000000 02000000 03000000 ... |
Error Detection in Corrupt JPEG Photos
There are many errors (typically from corrupted JPEG) that can be identified by JPEGsnoop. An error in the file may appear in many different forms when decoding a JPEG image. These may include:
- Overread scan segment - Decoder runs out of data when trying to read the variable-length huffman codes to produce all of the needed MCUs.
- Invalid huffman code - When searching for the next bits that appear in the file (within the scan segment), no match was found in the variable length huffman code tables.
- YCC clipping in DC - Each MCU adds or subtracts from the DC (average) value in the previous MCU. These should all stay within an 8-bit range, but corruption in the DC coefficient may cause this value to wander out of range. This type of error will cause sudden large-scale changes in color or brightness in your image. As this type of error generally won't recover, JPEGsnoop will only report the first 10 of these in the log file.
- >64 coefficients in MCU - When trying to find all of the AC coefficients that correspond to a single MCU, the decoder counted more than 63 AC coefficients (+ 1 DC coefficient) without observing an EOB (End of Block) or an exact count of 64 coefficients (an implicit EOB).
When JPEGsnoop detects an error, it generally will show you the exact location of the error in the original JPEG file. This will be reported in the form:
*** ERROR: Can't find huffman bitstring @ 0x00002DC3.1, table 0, value [0xffc84d5a]
*** ERROR: Bad huffman code @ 0x00002DC3.1
*** ERROR: Bad scan data in MCU(2,10): Lum DC CSS(0,1) @ Offset 0x00002DC3.1
           MCU located at pixel=(32,168)
Precise Bit Error Detection
In the above, the @ 0x00002DC3.1 refers to the hexadecimal file offset 2DC3 (11715) bytes, bit 1 (of 8). Note that JPEGsnoop has the unique ability to report precise positioning, including the bit within the byte that contains the start of the error!
4 users online

Reader's Comments:
Please leave your comments or suggestions below!Thanks!!
George
That said, when JPEGsnoop indicates that "Image is processed / edited", it means that the compression signature does not match the signature of the camera as stated in the EXIF info. This is a very confident indicator of some degree of modification. However, all it may be telling you is that the user has opened up a photo from their digital camera in Photoshop, and then resaved it (without further changes). Of course as soon as someone resaves an image, there is a great chance that they have modified the image in the process (resizing or content modification).
* Image is original
* Image is likely processed / edited
* Image is processed / edited
* Uncertain if processed or original
Isn't that 4 possible outcomes?
I have the same issue with a few images I have. Can you send me a note or post a reply for repairing images which as out of sync i.e. the image is all there but in bands across the image which are offset.
--
david
Hi David -- If you email me your corrupt photo, I'll see if I can fix it. Some type of damaged photos can be corrected, especially those which appear to have banding, shifted images and colors.
I have some jpegs which I suspected had corruption within the image data stream . I found your site whilst searching on the subject and must say that I have been most impressed with what I have found.
using the "decode scan image" option my suspicions were confirmed and a number of errors were reported.
I am familiar with using a hex editor but am unsure of whether it would be possible to repair the files (after sufficient research) or if it really is a lost cause.
A typical error report is below:
*** Decoding SCAN Data ***
  OFFSET: 0x00004182
*** NOTE: YCC Clipped. MCU=(   9,   5) YCC=(   -1,  126,  128) Y Underflow @ Offset 0x0000E7E3.2
*** NOTE: YCC Clipped. MCU=(   9,   5) YCC=(   -1,  126,  128) Y Underflow @ Offset 0x0000E7E3.2
*** NOTE: YCC Clipped. MCU=(  10,   5) YCC=(   -1,  126,  128) Y Underflow @ Offset 0x0000E7FC.0
*** NOTE: YCC Clipped. MCU=(  10,   5) YCC=(   -1,  126,  128) Y Underflow @ Offset 0x0000E7FC.0
*** NOTE: YCC Clipped. MCU=(  11,   5) YCC=(   -1,  126,  128) Y Underflow @ Offset 0x0000E817.1
*** NOTE: YCC Clipped. MCU=(   9,   6) YCC=(   -1,  126,  129) Y Underflow @ Offset 0x0001080D.6
*** NOTE: YCC Clipped. MCU=(  10,   6) YCC=(   -1,  126,  128) Y Underflow @ Offset 0x00010828.6
*** NOTE: YCC Clipped. MCU=(  10,   6) YCC=(   -2,  126,  128) Y Underflow @ Offset 0x00010828.6
*** NOTE: YCC Clipped. MCU=(  11,   6) YCC=(   -1,  126,  128) Y Underflow @ Offset 0x00010847.2
*** NOTE: YCC Clipped. MCU=(  11,   6) YCC=(   -1,  126,  128) Y Underflow @ Offset 0x00010847.2
    Only reported first 10 instances of this message...
*** ERROR: @ 0x0004D45D.5, num_coeffs>64 [67]
*** ERROR: Bad scan data in MCU(156,34): Lum AC CSS(1,0) @ Offset 0x0004D45E.7
           MCU located at pixel=(2504,272)
*** Resetting Error state to continue ***
*** ERROR: @ 0x0008932F.2, num_coeffs>64 [67]
*** ERROR: Bad scan data in MCU(188,60): Lum AC CSS(0,0) @ Offset 0x00089330.1
           MCU located at pixel=(3008,480)
... snip ...
Your opinion would be much appreciated.I'm pleased to report that I managed to recover these images almost perfectly! Your photos were great examples of heavy data corruption, which in turn helped me refine the fix methodology. What I found interesting, however, is that the corruption appeared to have some periodicity within the image, but not so much within the file stream.
Hi there Brian --
It is possible to fix some corrupted / broken JPEGs -- it just depends on how damaged they are. A single-byte corruption is quite easy to fix. In your case you see that there are a series of YCC clip warnings. Since these are very minor clips, they can be ignored.
However, later on in the image (around pixel 2504x272), you see that the scan data gets out of sync (and has problems from then on). When you look at the image below this point (vertically), can you still identify some of the original image -- ie. is it just wrongly colored, shifted to one side, etc. or is it completely garbled? If you can still recognize some of the image after the first error, then there is an easier chance that you may be able to recover it.
If you email the image to me, I'll have a look and see what is possible.
Cal.
Please note that due to the large number of comments on ImpulseAdventure, I am not able respond to all questions.