
|
|
|
|
Modifications for the Yaesu VX-7R
| |
| MARS/CAP and FREEBAND
MOD for VX-7R | |
|
| |
|
|
Author: Rick Jones
-
- Remove the battery
pack.
- Remove the sticker/cover seal for
the pressure sensing unit (SU-1), in the battery
compartment. This is the black strip above cellular warning
label and is where the SU-1 option
goes.
- Locate row of eight jumpers. They
are numbered.
- For Mars/Cap, remove solder jumper
5.
- For Freeband, remove solder jumper 4
and 5.
- Reset microprocessor. (Press and
hold in the 4, band, and v/m keys while turning the radio
on.
- ENJOY
TX Frequencies:
Freeband:
40-224.995Mhz and 300-579.995Mhz
Mars/Cap: 50Mhz-54Mhz,
140Mhz-174Mhz, 222Mhz-225Mhz, and 420Mhz-470Mhz.
| |
|
European Version |
yesterday I receive
my new VX-7r europeen version
there are jumper 2 and 3
solder
I remove jumper 4 and 5 for Mars/Cap
all seem OK after reset = [4] + [Band] + [V/M] keys while turning
radio on
BUT somebody remove only jumper 4,
difference ??
difference if you remove 4+5 or only 4
?
Users information
This is to inform you about
the European version VX-7R modification. I own the B1 European
version (Label outside the box indicates DST:EXP / TYP:B1). Prior to
any modifications the transceivers jumpers was soldered on
positions 2,4,5,7 (factory setting) and the unit was capable of
working on the following frequencies ONLY!
- 50-52MHz (RX ONLY,
NO TX Possible!)
- 144-146MHz (RX/TX)
- 430-440MHz (RX/TX)
Reception was NOT possible anywhere outside these
limits!
In order to modify it you should:
- Unsolder every
jumper
- Reset the transceiver by holding down MON/F + HM/RV +
Internet Key and power up the transceiver.
This will display the
Vertex Standard logo instead of Yaesu. Bear in mind that resetting
the transceiver by holding down 4 + BAND + V/M and powering up the
transceiver WONT work! It will just enter a curious set up:
- RX
on all bands
- No WX Channels
- Menu Item Misc Setup 20:
BEAT SQL (Instead of WX Alert)
- Menu Item Special Memory 6: JR
(Instead of Marine)
- Menu Item Misc Setup 17: Japanese (Instead
of English)
- Transmittion on 50-54MHz, 137-174MHz, 420-470MHz
After the aforementioned modification you will have
continues RX coverage from 504KHz up to 999MHz (including analogue
cellular frequencies - NO GAPS!)
Many thanks to Simeon
Leriou, SV2GNM for his patience and his will.
73s to
all.
George Blekas, sv2bxj (gibl@intracom.gr)
| |
| VX-7R European
Version Unlocked | |
|
| |
|
|
Author: SV2GNM and
sv2bxj
I own the B1 European version
(Label outside the box indicates DST:EXP / TYP:B1).
Prior to any modifications the transceivers jumpers was
soldered on positions 2,4,5,7 (factory setting) and the
unit was capable of working on the following frequencies
ONLY!
50-52MHz (RX ONLY, NO TX
Possible!)
144-146MHz (RX/TX)
430-440MHz (RX/TX)
Reception was NOT possible anywhere outside these
limits!
In order to modify it you should:
- Unsolder every
jumper
- Reset the transceiver by
holding down MON/F + HM/RV + Internet Key and power up
the transceiver
This will display the Vertex
Standard logo instead of Yaesu. Bear in mind that
resetting the transceiver by holding down 4 + BAND + V/M
and powering up the transceiver WONT work! It will just
enter a curious set up:
- RX on all
bands
- No WX
Channels
- Menu Item Misc Setup 20: BEAT
SQL (Instead of WX Alert)
- Menu Item Special Memory 6: JR
(Instead of Marine)
- Menu Item Misc Setup 17:
Japanese (Instead of English)
- Transition on 50-54MHz,
137-174MHz, 420-470MHz
After the aforementioned
modification you will have continues RX coverage from
504KHz up to 999MHz (including analogue cellular
frequencies - NO GAPS!)
Many thanks to Simeon Leriou,
SV2GNM for his patience and his will.
73s to all.
George Blekas, sv2bxj
(gibl@intracom.gr)
| |
|
| Author: Chip Margelli, K7JA -
     Subject: RE: [Fwd: Re: FW: VX-7R info request]
        Date: Fri, 14 Jun 2002 15:53:25 -0700
        From: "Chip Margelli" <c.margelli@vxstdusa.com>
Organization: Vertex Standard
          To: "Ken" <n1kk@netzero.net>
By the way, with all the snipping and chatter
on the VX-7R Yahoo group about "My Menu" not working, it isn't
something that is "broken."
It turns out that the "My Menu" feature never
made it to production. Instead, they put in a "toggle" on the
configuration of the Internet key. In the default mode, it works
with the WIRES protocol, as described. Now the fun starts.
If you turn the radio off, then press and
hold in the Internet key while turning the radio on, you'll notice a
"U" appearing along the left edge of the display while the big "VS"
thing is displayed for a few seconds during switch on. In this case,
the Internet key is configured for other Internet linking protocols,
like IRLP. You program something into the DTMF Memory (TSQ/DCS/DTMF
#8), then, during regular operation, you press the Internet key
while you're talking. If, for example, your IRLP repeater requires
you to send "#456" to link to node 456, you just program "#456" into
a DTMF memory, then press the Internet key while you're pressing the
PTT; basically, this is a "hot key" link to a DTMF Autodial Memory.
So the VX-7R really is a powerful
Internet-access tool. . .more so than anybody thought.
Just thought you'd be interested.
73 de Chip Margelli,
K7JA
|
| |
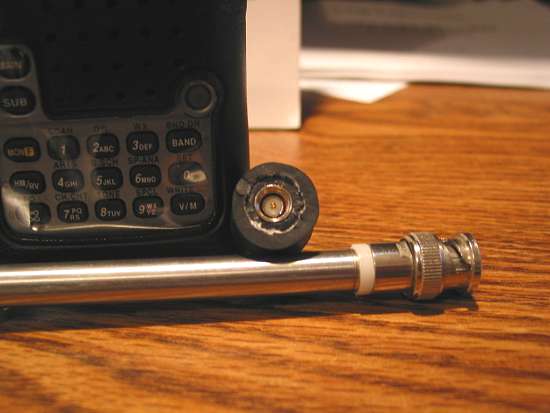
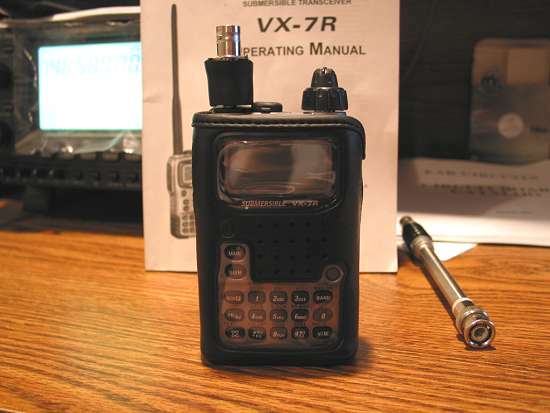
| VX-7R, Homebrew SMA
to BNC adapter | |
|
| |
|
|
Author: Ken, N1KK
-
I made an adapter using the outside
rubber sleeve of 2 different size heavy duty electrical
cables. I needed 2 different sizes to get the right inner and
outer diameters to cover the actual metal adapter.
The result is a wider diameter base to
help support larger external BNC antennas.
| |
Author: -
If you hold down MONI/F key and
Internet (wires) and Set(0) key, and power on you can use the
frequency knob to go through a menu of different thing
including MAX Modulation.
I put mine on 50 and got really good
results. Press V/M key to be able to change the value with the
frequency knob.
From: ka7ien
Subject: Re: VX-7R Max Modulation tweak
Advertisement
Turn the knob so you aren't on the "PLL
REF" option, then you can press the BAND key. This is because
the "PLL REF" option only shows up on the 440 band.
I don't know if this will format
correctly but here is how my radio was set up from the
factory: 52 145 222 435
PLL REF 126
HIS SQL 0 0 0 0
THLD SQL 170 172 172 160
TIGH SQL 108 138 138 78
S1 LEVEL (NFM) 36 32 32 50
S9 LEVEL (NFM) 72 68 68 84
S1 LEVEL (WFM) 60 58 58 72
S9 LEVEL (WFM) 82 80 80 94
HI POWER 147 145 145 203
L3 POWER 113 114 114 154
L2 POWER 82 88 72 113
L1 POWER 52 56 57 59
MAX DEV 113 81 40 38
TN 67.0 45 56 10 89
TN 123.0 40
TN 151.4 16 19
TN 167.9 11
TN 254.1 11 13 22 22
DCS DEV 40 12 11 6
LCD TC V 2 2 2 2
LCD IREG 4 4 4 4
| |
Author: -
Model- EXP/B2 Europe
All jumpers open.
What you get
TX - 40~222 Fm and Air band- yes
     300~550
RX - As the manual says.
What you lose:
- ARS on Ham bands
- .Special Marine Memory-instead you
get JR Memory and TV in Weather channels ( MONF+ 3 WX)
Thats all.
Have a good
Time.
| |
| |
| YAESU VX-7 free band
(europe version) | |
|
| |
|
|
Author: SV1EFO Hlias
-
If you have a vx-7 europe version here
is how to modify.
- Remove the battery
pack.
- Remove the sticker/cover seal for
the pressure sensing unit (SU-1), in the battery
compartment. This is the black strip above cellular warning
label and is where the SU-1 option
goes.
- Locate row of eight jumpers. They
are numbered.
- For Freeband, remove(Unsolder) all
solder jumper exept 3
- Reset the transceiver by holding
down MON/F + HM/RV + Internet Key and power up the
transceiver
This will display the Vertex Standard
logo instead of Yaesu. Bear in mind that resetting the
transceiver by holding down 4 + BAND + V/M and powering up the
transceiver WONT work!
TX Frequencies:
Freeband:
40-224.995Mhz and 300-579.995Mhz
Have fun
SV1EFO
Hlias
| |
|
|
|
|
|
 KB2LJJ